
When your dryer won’t stay running during a cycle, it can throw a huge wrench in your laundry routine.
Understanding Your Dryer's Heating System
Safety First: Prioritizing Your Well-being
Diagnose the Heating Failure Before Replacing Parts
Tools and Materials You Will Need
Step-by-Step Guide: Replacing Your Dryer Heating Element
Maintaining Your Dryer for Longevity
When to Call a Professional for Repair
Frequently Asked Questions

Replacing a dryer heating element is a common repair that can save you significant money compared to hiring a professional or purchasing a new appliance. This guide provides detailed instructions to help you perform this task safely and effectively.
You’ll learn about the symptoms of a failing heating element, the tools and parts required, and a step-by-step replacement process.
KEY TAKEAWAYS
The electric dryer's heating system consists of control components, wiring and the element that heats air to dry your clothes.
Identifying a failed heating element is crucial for timely repair. Several clear indicators suggest your heating element requires replacement:
Before attempting any repair on an electrical appliance, safety must be your absolute top priority. Failure to follow safety guidelines can result in serious injury, electric shock, or fire.
Save yourself the trouble of replacing unnecessary parts by accurately diagnosing the heating failure before you buy a new heating element. Problems with fuses, thermostats, thermistors (temperature sensors), the timer or the electronic control board can prevent dryer from heating too.
Here’s a detailed DIY video that shows how to diagnose a heating failure in a common electric dryer with a control timer:
If you have a different type of dryer, you can use similar diagnostic steps to determine what’s causing the heating failure in your model.
If you’re unable to find the cause of the heating failure, you’re likely better off having a professional appliance repair technician examine and repair the dryer rather than trying to fix it yourself.
If you’re certain that the heating element is bad (or you want to replace the dryer element even if it may not be defective), follow the steps below to replace that part in a common type of electric dryer.
Having the correct tools and replacement parts before you begin heating element replacement will streamline the repair process.
You will need a basic set of household tools for this repair:
Obtaining the correct replacement heating element is crucial.
Heating elements are not universal. You must purchase one specifically designed for your dryer's make, model number, and serial number. This model information is typically found on a sticker inside the dryer door, on the back panel, or near the lint trap.
Pro tip: Always purchase OEM (Original Equipment Manufacturer) parts or high-quality aftermarket equivalents approved by the manufacturer to ensure compatibility and reliability.
This section provides a detailed, step-by-step process for replacing your dryer's heating element.
While specific dryer models may vary slightly, these steps outline the general procedure to replace the element in the most common type of electric dryer. For some dryer models, you’ll need to remove the front panel to access and replace the heating element.
Here’s a DIY repair video that illustrates all of the heating element replacement steps:
This is the most critical safety step.
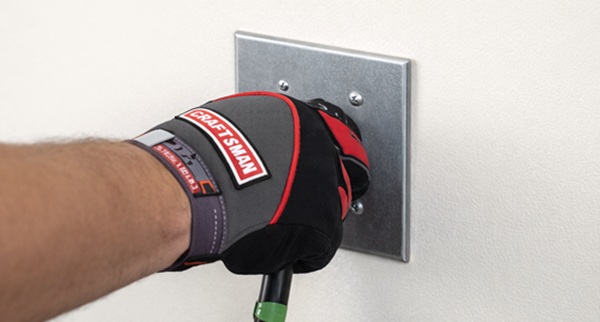
Unplug the Dryer: Pull the dryer away from the wall, firmly grasp the plug and remove it from the electrical outlet.
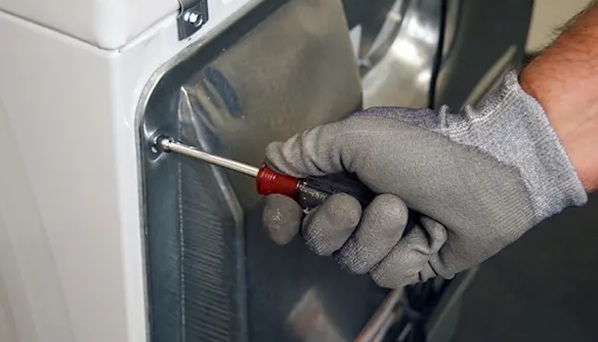
Use a nut driver or screwdriver to remove all screws securing the large back panel. Carefully set the screws aside in a safe place.

Pull the back panel off of the dryer.
Pro tip: Document the location of screws and connections, perhaps by taking photos with your phone, to aid reassembly.
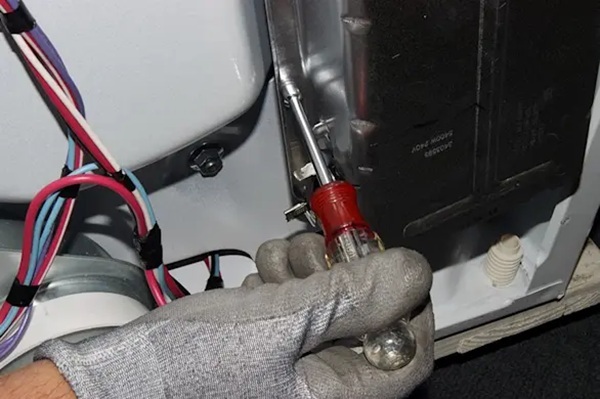
Locate the heating element near the bottom of the dryer.
Mark the location of wires connected to the heating element and high-limit thermostat (or take a digital photograph), so you know how to correctly reconnect them later.

Disconnect the wires, using slot screwdriver to pry the wires off the spades if necessary.

Remove the mounting screws from the heating element using a 1/4-inch nut driver.
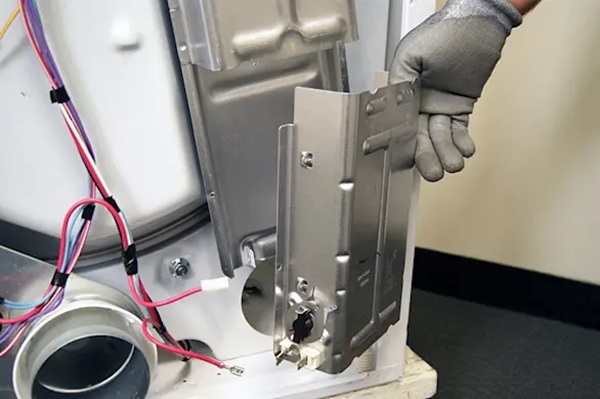
Pull the old element off.
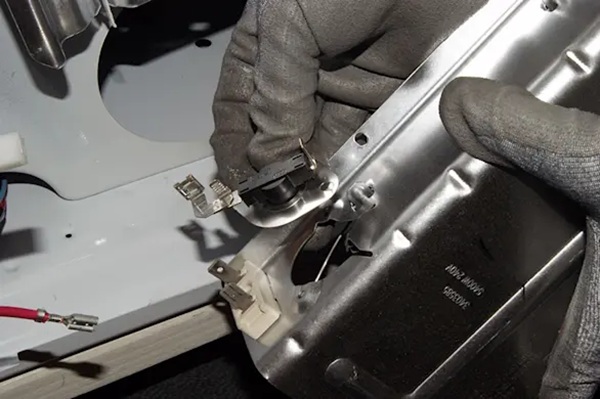
Remove the high-limit thermostat from the existing heating element and install it on the new one.
Position the new heating element on the heater box and line up the mounting screw holes. Insert the mounting screws and tighten them firmly.
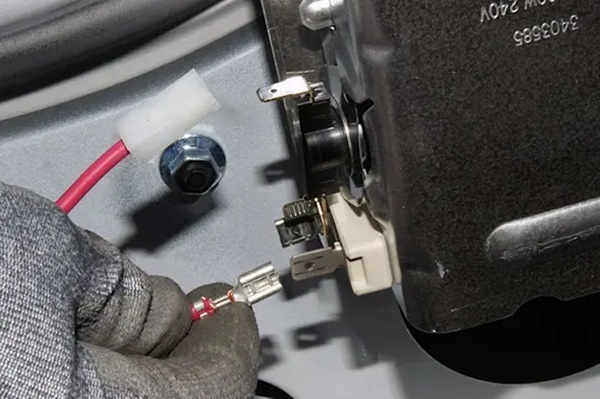
Properly connect the wires to the new heating element, following the labels or digital photograph.
WARNING: For safety and to avoid damage to the new element, the wires must be properly connected. If you are unsure how to connect the wires, have a service technician complete this repair.
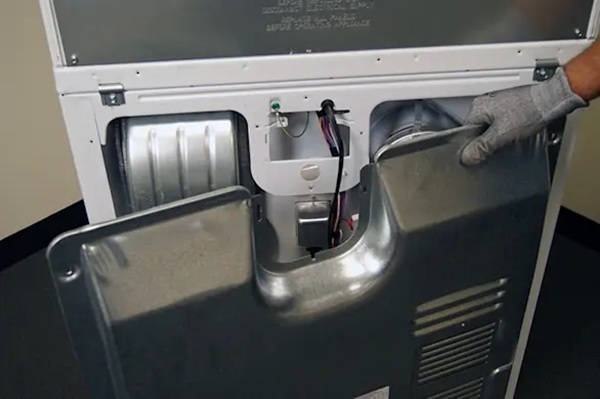
Position the back panel on the back of the dryer. Line up the mounting screw holes. Insert the mounting screws and tighten them firmly.
Plug the dryer into the wall outlet to restore electrical power.
Follow these steps to test the dryer:
Pro tip: If the dryer heats but then stops heating after a short period, it could indicate a faulty thermostat, defective thermistor, bad high-limit thermostat, or a number of other problems. Have a professional service technician diagnose and repair the dryer if it won’t heat properly after replacing the heating element.

Proper maintenance extends your dryer's life and efficiency, preventing future heating element failures.
Schedule a Technician: Have a qualified Sears appliance technician inspect and maintain your dryer annually. The tech can identify potential issues before they become major problems, clean internal components, and verify electrical connections.
Pro tip: Bundle the dryer maintenance service with washing machine maintenance service to have the technician inspect and maintain both laundry appliances at the same time. Keeping your washer well-maintained will help your dryer run smoothly and efficiently.
While many dryer repairs are manageable for a DIY enthusiast, certain situations warrant professional intervention.
If you encounter persistent electrical problems like circuit breakers tripping repeatedly, or if you are uncomfortable dealing with high voltage, it is best to call a professional. Diagnosing complex shorts or faulty wiring requires specialized knowledge and tools.
If your clothes dryer model has components or a disassembly process that you find unfamiliar or confusing, do not proceed.
Some Kenmore, GE, Maytag and Whirlpool dryer models are particularly difficult to disassemble.
Attempting repairs without understanding the dryer or its internal systems can lead to further damage and/or safety hazards.
Any situation where you feel unsafe—such as detecting burning smells, seeing sparks, or feeling electrical shocks—demands immediate professional assistance.
Disconnect power and do not use the dryer until it has been inspected by an expert.
Generally, a clothes dryer is one of the easiest appliances to fix on your own, but every repair situation is unique.
Although we show you how to diagnose and repair a heating element failure in this article, we encourage you to always use extreme caution when attempting DIY appliance repairs.
Don’t risk your health and safety to save money on appliance repairs.
The bottom line: if you’re not completely confident in your ability to get your dryer working again on your own, schedule appliance repair service and we’ll do it for you.
Count on our knowledgeable technicians to provide thorough dryer repairs, ensuring your appliance operates at peak performance for years to come.
Loading scheduler options...
When your dryer won’t stay running during a cycle, it can throw a huge wrench in your laundry routine.

Discover the reasons why your dryer is not drying and get expert troubleshooting tips to fix common drying problems.

This Sears Home Services guide shows how to replace a thermal fuse in a dryer, including safety tips, troubleshooting steps, and best practices to maintain drying performance.

Learn why your dryer is squeaking and how to fix the problem with Sears Home Services.
A dryer drum is the main interior component of a clothes dryer where clothes are placed to be dried. It rotates during the drying cycle, allowing heated air to circulate through the clothes.
A dryer filter, commonly known as a lint filter, is a component of a clothes dryer that captures lint and other debris from clothes during the drying process, preventing them from clogging the dryer vent.
A dryer pedestal is a platform that elevates a dryer off the ground, making it easier to load and unload laundry while also providing additional storage space in some models.
A dryer rack is an accessory for clothes dryers that provides a stationary platform to dry items without tumbling, ideal for delicate or bulky items, or shoes that might be damaged by the usual drying cycle.
Whirlpool dryer not heating? Get expert Whirlpool dryer repair for gas and electric models. Fast, reliable service to restore heat today!
The most common reasons your Samsung dryer is blowing cold air are an open heating element, a failed thermal cut-off fuse, or a defective PCB.
The most common reasons your Bosch dryer is not drying are a clogged vent tube, open heating element or a bad wire connector.
The most common reasons your Hotpoint dryer is not heating are an open heating element, failed thermal cut-off fuse or a faulty thermal fuse.
The most common reasons your Maytag dryer has no heat are an open heating element, failed thermal cut-off fuse or a faulty thermal fuse.
The most common reasons your Samsung dryer has no heat are an open heating element, failed thermal cut-off fuse or a faulty thermal fuse.