
Master summer lawn care with these tips on mowing, watering, planting, and pest control to keep your yard looking its best.

Experiencing trouble starting your riding mower? The issue might be with the starter on your lawn mower. Before you decide to replace it, knowing how to test a starter can help identify if it’s truly faulty. In this guide, we’ll walk you through the process of how to test a riding mower starter using a multimeter and discuss how to replace it if necessary.
KEY TAKEAWAYS
To effectively test a riding mower’s starter, you’ll need to know the basics of the starting system.
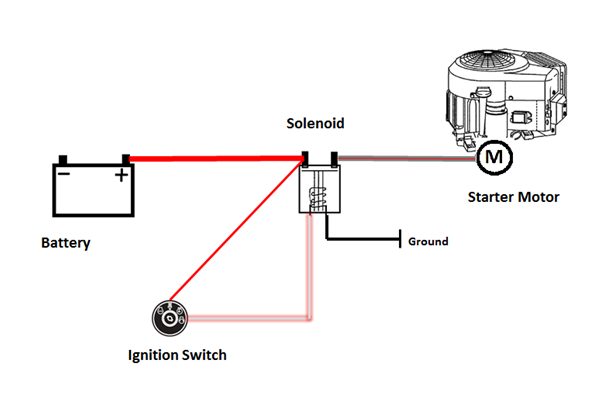
The riding mower or lawn tractor starting system consists of these basic components:
Once the engine rotates, the spark plugs fire and the pistons take over to run the engine.
Many different problems can prevent the starter motor from working – including a failed starter motor. When you turn the ignition key and hear the click of the solenoid but the engine doesn’t crank, you can suspect that the starter motor is bad. When the starter motor gets electrical current through the solenoid but the starter motor doesn’t spin, the starter motor very well could be defective. Other failures can also cause this symptom.
To know for sure if the starter motor is bad, you’ll need to properly diagnose the starting failure. Read on to find out how to determine whether you have a failed starter motor.
Here’s a detailed video and written troubleshooting procedure for determining whether the starter motor is bad:
First, check for a weak battery. The click you hear when you turn the key means that the starter solenoid coil is getting power.
The starter solenoid only needs a little current to make the solenoid coil click, but the starter motor needs a lot of current to spin the motor. So a weak battery could have enough current to trip the solenoid coil but not enough current to crank the engine.
To check the battery, use a multimeter to measure the DC voltage across the battery terminals.
A fully charged battery measures more than 12 volts DC. To provide enough current to spin the starter motor, the battery typically needs to be at least 75 percent charged. Charge or replace the battery if the meter measures less than 12 volts.
The starter motor should spin the engine after you recharge the battery. If not, the next step is to check the battery cables.
If the battery is okay, then corroded or broken wire cables could prevent the starter motor from getting power.
If you find corrosion on the battery terminals and cable ends, here’s how to safely remove it:
Using a shop rag, thinly coat the battery terminals with petroleum jelly to help prevent corrosion.
If you found no corrosion, or if the motor still won’t start after you remove corrosion, check if the red battery cable is delivering power to the solenoid post by measuring voltage on the red terminal post.
With the multimeter set to measure DC voltage, touch the red meter probe to the red post on the starter solenoid and the black meter probe to the negative terminal on the battery. It should measure more than 12 volts. If it doesn’t, replace the red battery cable.
A word of warning here: Don’t let the meter lead touch both the solenoid posts at the same time or you’ll see a severe spark.
If the motor still doesn’t turn over with a good red cable, the solenoid is next on the list of likely suspects.
Check the starter solenoid by measuring voltage on the black post at the same time as the solenoid clicks. Here’s how. (You can also see details in the above video.)
You'll need some clip-on meter probes to hold the probes on the wires as you turn the ignition key, unless you have a helper to turn the key while you hold the probes on the wires.
When the solenoid coil clicked, the multimeter measured more than 12 volts if the black post gets power. If it measured no voltage when the solenoid coil clicked, replace the starter solenoid.
If the multimeter measured more than 12 volts on the black solenoid post after the solenoid clicked, you know that the starter solenoid works. Now, check the heavy cable that connects the solenoid to the starter. That cable needs to carry enough current to turn the starter motor.
To check the starter motor cable, use a voltage drop test to measure resistance through that cable. Using a voltage drop test is more accurate than a simple resistance test for a large cable with many copper strands, because a simple resistance check simply detects any current; it can’t detect whether the cable can carry enough current to spin the starter motor.
Measure voltage—also called voltage drop—from the solenoid post to the starter motor stud. Ideally, you should measure less than 1 volt during this test, indicating voltage is nearly the same at the solenoid post and the starter motor stud and that heavy current is flowing freely through the cable. If it’s more than 1 volt, it means wire strands inside the cable are broken.
If you measure a drop of more than 1 volt through the starter cable, replace the starter cable.
If the starter cable is okay, you know that the starter motor is getting power.
Since the motor isn't turning, we’ve narrowed the failure down to a seized engine or a failed starter motor.
Check for a seized engine and if it’s not locked up, you’ll know that the starter motor failed.
To see if the engine spins, remove the plug from the screen above the flywheel to access the flywheel bolt. Use a socket wrench to rotate the flywheel bolt clockwise and try to spin the engine. If the engine won’t spin because it’s locked up, have a service technician diagnose and repair the riding mower problem.
If you can spin the engine, replace the starter motor because it’s not spinning the engine when activated.
If you follow these troubleshooting steps, you should be able to get that riding lawn mower engine started so you can get back to mowing.
If you encounter any difficulties or are unsure about any step, stop and schedule lawn repair near you. We’ll send a local Sears Home Services technician to your home to fix the starting problem and get your riding mower back in top shape.
With years of expertise, our technicians can diagnose and repair your riding mower no matter the problem, so you can get back to mowing quickly.
Loading scheduler options...
Master summer lawn care with these tips on mowing, watering, planting, and pest control to keep your yard looking its best.

Navigating through common riding mower problems can be daunting, but understanding whether it's a DIY fix or a job for a repairman is crucial.

Find out if the ignition switch on your riding mower is bad. Learn how to diagnose ignition switch problems on your lawn tractor at Sears Home Services.

Prepare your yard for the vibrant resurgence of spring with these essential lawn care steps.
The drum is the core part of the washer that holds your laundry and enables the cleaning process through rotation, agitation, and rinsing.
The 608 Certification, mandated by the Environmental Protection Agency (EPA), is required for HVAC technicians to legally handle refrigerants. It ensures technicians understand refrigerant types, environmental impact, and proper handling techniques.
A compressor is a mechanical device that increases the pressure of a gas by reducing its volume, essential in various systems including refrigerators, air conditioners, and HVAC units for cooling and refrigeration processes.
A condenser is a component of HVAC and refrigeration systems, responsible for releasing absorbed heat from the refrigerant into the outside air or a water line, thus facilitating the cooling process.
When your Payne central air conditioner won’t turn on or isn’t cooling, check for power problems, a failed capacitor, or a clogged condensate drain. This guide covers quick, safe troubleshooting steps and explains when to call Sears Home Services for expert central AC repair.
When your ICP central air conditioner won’t turn on or isn’t cooling, check for power problems, a failed capacitor, or a clogged condensate drain. This guide covers quick, safe troubleshooting steps and explains when to call Sears Home Services for expert central AC repair.
When your Heil central air conditioner won’t turn on or isn’t cooling, check for power problems, a failed capacitor, or a clogged condensate drain. This guide covers quick, safe troubleshooting steps and explains when to call Sears Home Services for expert central AC repair.
When your Carrier central air conditioner won’t turn on or isn’t cooling, check for power problems, a failed capacitor, or a clogged condensate drain. This guide covers quick, safe troubleshooting steps and explains when to call Sears Home Services for expert central AC repair.
When your Comfortmaker central air conditioner won’t turn on or isn’t cooling, check for power problems, a failed capacitor, or a clogged condensate drain. This guide covers quick, safe troubleshooting steps and explains when to call Sears Home Services for expert central AC repair.
When your Ruud central air conditioner won’t turn on or isn’t cooling, check for power problems, a failed capacitor, or a clogged condensate drain. This guide covers quick, safe troubleshooting steps and explains when to call Sears Home Services for expert central AC repair.